 Tersby
A template site's form
On the “Sales” tab, block “Order form”:
- name and phone are always there; you can change their labels;
- “Extra fields” ask for something more, such as a city or a size, and can be required;
- a hidden tag adds a label to every order from this site; visitors don't see it;
- the “Message after sending” shows in place of the form;
- “Link after sending”: paste an address, such as a payment page, and the visitor goes there right after the order, instead of the message.
Your own form in expert mode
A page can have as many forms as you like, and each has its own fields, its own action after sending and its own notifications. A new “Order form” starts with “Name” and “Phone”.
To set a form up, select it and press “Set up the form” on the right. The gear above the form on the canvas, or a double click on the form, opens the same window. It has three tabs: “Fields”, “After sending” and “Notifications”. Everything is saved to the draft by itself and goes live after “Publish the changes”.
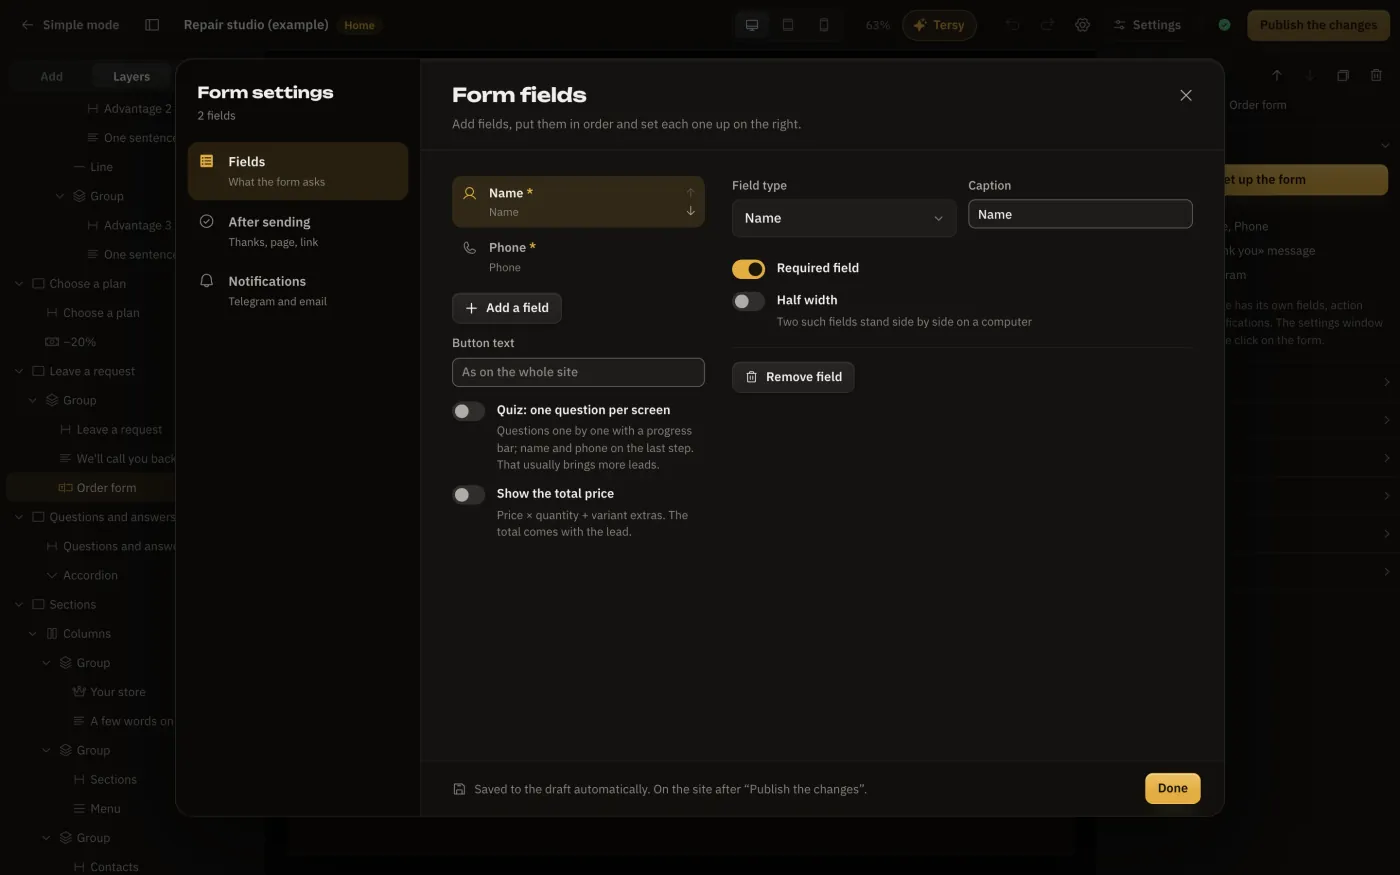
Fields
The fields are listed on the left: click one and its settings open on the right (type, label, hint, “Required field”, “Half width”). The arrows change the order; “Add field” opens the choice:
| Field | What for |
|---|---|
| Name, Phone, Email | contacts; the phone has a country picker and a number check |
| Line of text, Long text | street, house number, comment |
| Number | any number |
| Quantity (− 1 +) | a counter with buttons, such as how many bottles; set “from”, “to” and where it starts |
| List | a choice from options, such as a town |
| One of | a few options as radio buttons |
| Checkbox | “I need a cooler”, “I agree to the terms” |
| Date | a delivery date |
| Booking by date and time | a booking calendar: a day, then a free time |
| Hidden tag | a label in every order; visitors don't see it |
A form must have a phone or an email: without them an order can't be taken.
Booking by date and time
The “Booking by date and time” field shows visitors a calendar in the site's colours and language: they pick a day, then a time. In the field's settings:
- Working days and hours, “From” and “To”;
- Duration of one booking, from 15 minutes to 2 hours, or “Whole day, no time”;
- How many days ahead people can book, and not sooner than how many hours from now;
- Time zone: times always count in it, wherever the visitor is;
- No double booking: a booked time is no longer offered, one booking per time. If two people send the form for the same time at once, only the first gets it; the site asks the second to pick another.
The chosen date and time arrive in the lead, the CRM and notifications. To free a time, mark the lead as spam or delete it.
Products: variants, total price, delivery and a file
- Product variant with price: colour, size, bundle. Each variant can have a picture and an extra charge; with pictures, variants show as cards.
- Show the total price (the «Fields» tab, at the top): visitors see what it comes to as they choose: the product price plus variant extras, times the quantity. The price comes from «Product price» or, if empty, the site's price. The total is worked out again on the server and arrives in the lead as «Total».
- Nova Poshta: city and branch: the visitor finds the city by name, then a branch or parcel locker by number or street. The lead gets the city and the branch.
- File: photo or document: JPG, PNG, HEIC, PDF, Word, Excel up to 10 MB. The lead carries a link to the file that only people signed in to your account can open.
Quiz
Turn on «Quiz: one question per screen». Each question gets its own step with a progress bar and «Back» and «Next», and name, phone and checkboxes come together on the last step. When a step is a single choice, the form moves on by itself once it's picked.
Two columns
Turn on “Half width” for a field. Two such fields in a row stand side by side on a computer and one under the other on a phone. That's how shop-style forms are made: contacts and address on the left, quantity and comment on the right.
After sending
On the “After sending” tab, choose:
- “Thank you” message in place of the form, with your own text;
- Thank-you page of this site, such as “Thank you”;
- Go to a link: any address, including a payment page or a messenger;
- Open a popup, for example with a discount on the next order.
How to make a “Thank you” page is in “Pages, ‘Thank you’ and popups”.
Notifications
On the “Notifications” tab every form has its own switches:
- Telegram: the lead goes to the chats from “Notifications”, like every lead. Turn it off if this form's leads aren't needed there.
- Email: an email with the lead and all its fields. Enter up to three addresses separated by commas, or leave it empty to send it to the account owner's email.
Leads are always in “Leads”, whatever is chosen here.
A button to the form
To make the “Order” button on the first screen lead to the form, give the form's section an “Anchor” (for example, form) and set the button's action to “To section” with that section. Or ask Tersy: “add an order form and make every button lead to it”.